How to Self-Host InvoiceNinja on ALL-INKL.COM
I’ve told you before how much I love Open Source Software. It does not hide any secrets and its developers must have some confidence in their code to make it publicly available. I found an Open Source Tool called InvoiceNinja lately and fell in love immediately.
I would not recommend anything to you I’ve not been using enthusiastically myself. Bold links are affiliate links. I recommend what you’ll find there and If you make a purchase, I will get a commission without additional costs to you.
Aren’t you dreaming of the life of a digital nomad working at the beaches of Costa Rica and Thailand with your laptop for international clients? Well, who isn’t! What you desperately need to ever achieve that is global billing and accounting, right?
You can use InvoiceNinja as SaaS with reasonable pricing. In fact, up to 100 Clients & Unlimited Invoices for free is even more than reasonable.
But we are the cool kids and cryptic installation guides do not scare us at all, right? We will be selfhosting InvoiceNinja on our all-inkl.com webspace, the most popular web hosting provider here in Germany. And we will write a tutorial about how we have achieved this heroic deed! Well, I will. You just have to follow it to benefit from my heroism.
Local WordPress Community
First, we need to add the subdomain we want to have our InvoiceNinja on. So let’s head over to the KAS, shall we?
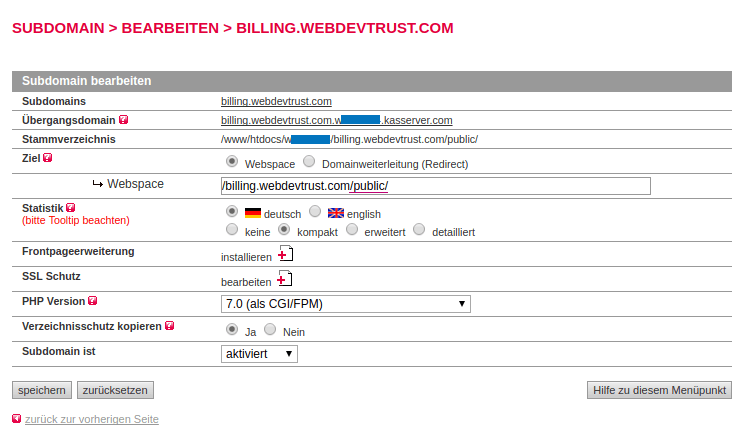
I wanted InvoiceNinja to be accessible via billing.webdevtrust.com so I’ve set up the subdomain, downloaded the ZIP and FTP-uploaded everything inside the ZIPs ninja-folder to the path in my webspace (/billing.webdevtrust.com/) my subdomain had been pointing to.
After the upload had finished, I redirected my subdomain to the now present public-folder inside, and added a free Let’s Encrypt SSL certificate to the subdomain with one click for yummy HTTPS. I always force SSL on my domains because why not.
So now my billing.webdevtrust.com subdomain points to the public-folder of the InvoiceNinja software. When accessing the subdomain for the first time, we are presented with the InvoiceNinja Setup. The setup will compile a .env file into the root directory of the subdomain, but more on that later.
Database Setup
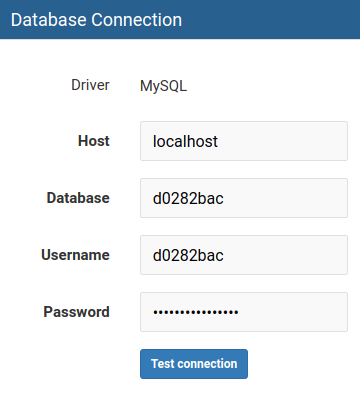
Well, you just create a new database. Comment it with InvoiceNinja for obvious reasons. You then enter the database credentials into the setup fields. Boring, I know.
Mail Setup
Now you create a new email account or use an existing one for InvoiceNinja to send invoices or quotes per email. This doesn’t get more exciting either.
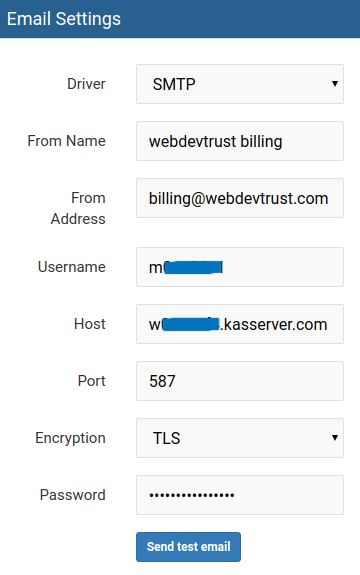
After you have entered user credentials, agreed to their Terms of Service and clicked [Submit] you’ll have to wait for some time until an .env file is compiled into the root folder of your InvoiceNinja-installation. The last thing you want to do is to enter your Google Maps API Key into the .env file like documented.
Now log into InvoiceNinja and start setting up clients and projects. You probably expected something more exciting after viewing the installation guide, but it really is that easy to selfhost InvoiceNinja on all-ink-webspace.
White-labeling the software has been slightly more exciting, but not by much. You have to create an account and go to Settings > Account Management to buy the plan. You then apply the license key you’re given to your selfhosted app. And do not worry if you need something clarified. InvoiceNinja-support is very responsive and helpful.
Updating your Installation
InvoiceNinja is being improved constantly and you want to benefit from that effort for obvious reasons.
I recently updated my 3.8.1 versions to 4.1.0 which has been a very smooth experience. After reading the official guide and making a backup of my database I just download the zip of the latest version and overwrote the files of my outdated installation with that. The app then detected a new version and started a database update on my next visit which took ~30 seconds on my installation. That was it.
White-Labeling InvoiceNinja
White-labeling the software has been slightly more exciting, but not by much. You have to create an account and go to Settings > Account Management to buy the plan. You then apply the license key you’re given to your selfhosted app. And do not worry if you need something clarified. InvoiceNinja-support is very responsive and helpful.
